

This is a quick blog post so that others faced with a similar dilemma can see if they can use my techniques to shift the factory applied paint on their Rapido USRA B&O M-24 boxcar. I have several other blog posts and models I am working on, but this was an unexpected issue that came in the mail with my factory ordered model. I expected a brown boxcar to arrive and when time allowed I would change some lettering to reflect a ten year old boxcar on my layout set in 1950.
When the car arrived along with a Midwestern road version that I was really after to serve my milling plant, I took a few minutes at lunch to add some black and gray pin wash to both cars. The finish was glossy enough that I thought the technique could work straight out of the box, no gloss coat required.
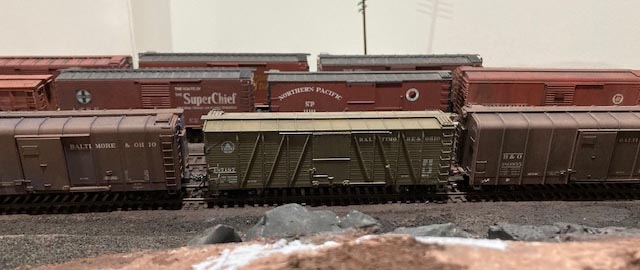

The pinwash did work and since I was was working near a large window, I had lots of sunlight to assist. This environment made me look closer at the color of the B&O car and I was convinced it was more green than brown. Sort of an US Olive Drab Green. I took some photos. And then when I got home I put it on the layout next to other boxcars of all kinds and to my surprise it looked even more green. I know lots of people have some type of color blindness so I thought that’s what I was seeing. But it was definitely different and didn’t come close to any of the B&O brown boxcars I own, either commercially painted or those I painted myself. I took some more photos on the layout under 5000K LED bulbs and shared them with a few friends who model the B&O and look at colors critically. They agreed that it was green I was seeing. For context, let me add that B&O boxcars of that era were painted a very average brown color until the mid 40s when a much more red freight car red was introduced. That later color is the color many see in color photographs of 50s era B&O boxcars. These changes in color also go along with changes in lettering. These were detailed by Chris Barkan and this information is available on the B&O Railroad Historical Society website. And to make it more difficult to know a true color there are not too many color photographs of the older brown color.

I should have stated this up front and it is very important to say. I am not, and I repeat not, someone who focuses on exact color matches and original drift cards in my modeling. But, I do expect that when I purchase a well detailed and accurate prototype model that the color be close to the prototype. I don’t know the correct color for every model I buy and I trust the manufacturer of a high end product to get it close. This was not close by my standards for a B&O boxcar, but it may be fine for many others.
So what to do? I am aware that the manufacturer worked with the BORRHS so I assume they did their due diligence, so I wouldn’t expect a refund or a new model. Things happen. I looked at this as an opportunity to learn a little more about the color wheel and see how I could make this model match the other cars in my B&O car fleet. Many of the other cars in my fleet are Rapido, so this is not an indictment of their efforts. I certainly appreciate all the steam era models they have brought to the marketplace and support their efforts as much as I can.
So learning a little more about the color wheel and using techniques shared with me on the Real Steam Freight Cars .IO group, I decided to try to tint a matte overspray with a color that would shift the color of the car closer to what I believe is appropriate for a B&O boxcar painted in the late 30s or early 40s. I assumed this era based on the stenciling recreated on the model. As I detailed in a previous blog post, I now use Winsor and Newton Galeria Matt Varnish (I switched from Dullcote for performance and economic reasons, see previous blog), which is water soluble and can mix with the Vallejo Model Air colors that I choose to use.
I loaded some Matt Varnish in my airbrush and added a few drops of Vallejo Fire Red and less German Red Brown (about 5 to 1). I sprayed it on some white paper to see how much red brown would be applied to the model. I chose a red brown mix as that is opposite green (blue and yellow mixed) on the color wheel and should mute out some of the green in the boxcar’s appearance. It took two coats and the overspray turned the white lettering pink, there was a fair amount of red in the tinted matte varnish.
It might not have been the best solution, but I was trying to save myself from having to repaint and decal the model, so I used a microbrush to quickly wipe off some of the overspray from the lettering while it was still wet. It worked for the most part, but up close (last photo in this post) you can see where the overspray was wiped off of the car body outside of the lettering. Hopefully it’s not too noticeable, but it did cause me to go a little heavy on the weathering. Not inappropriate for a ten year car, I hope.


I added some paint failure spots on the roof with gray paint, blue washes and assorted colored pencils, then weathered it with black pastels to simulate soot and a hard life in the Northeast. The sides were lightly sprayed with a gray/black tinted matt varnish to add some lighter weathering to look softer, but similar to the roof.
The last details I add were new decaled reweigh and repack stencils closer to 1950, some faded chalk marks with sharp colored pencils, and a couple of brighter chalk marks with decals. I added spots of Pledge for a gloss decaling surface where needed for decaling, then after heavy doses of Walters Solvaset, covered the decal spots with matt varnish and some gray chalks to fade them a little. The trucks and wheels were sprayed with Vallejo NATO Black like most cars on my layout. The couplers were replaced with Kadee #158 scale head couplers. I still need to add some rust paint to them.
I hope this provides some helpful information to others and allows them to rescue this model or others using similar techniques. I certainly wasn’t expecting or relishing this challenge, but in the end I learned some new things and ended up with a model that fits my layout well. That’s got to be worth something!


