Making a Modeling Bench

We all have a place we build our models and do our research. For me much of the research is on the couch with the iPad. But where do we build our models? My usual answer is on a piece of plywood between two filing cabinets. For me formal education interceded and I learned about ergonomics. Probably too much seriousness for just a hobby, I agree.

One day I wondered into a local jewelry store in Greensboro, NC, the kind of place that does it all. I just wanted a new band for a watch. You remember watches, we wore them on our wrists before we used our mobile phones to tell time. I noticed the proprietor changed my watch battery at a sophisticated bench that was meant for so much more. His skilled hands could create fantastic jewelry at this bench and I saw a great modeling bench. It had a pan to catch to dropped parts, places for small vices, storage for small files and drawers for tools needed on a whim. A modeling bench!

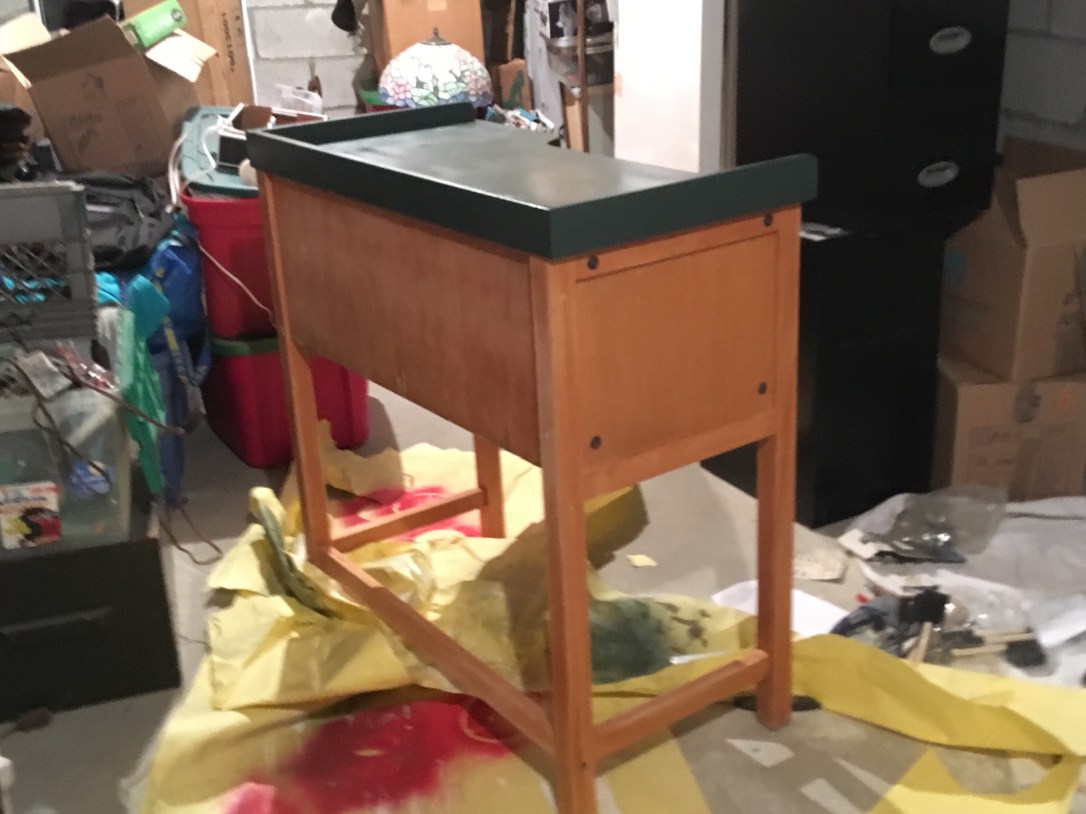
He called it a jeweler’s bench, I thought tomato vs. tomato. A jeweler works on small parts and builds things, so does a modeler, maybe your bench could fit my hobby. I asked him where I could buy one cheap and he told me about a local jeweler’s group. I picked up a used bench for $50. The main work surface was pitted from soldering operations gone astray. I decided I could do some light sanding in the frame, refinish the bench top.

Since this piece was going to reside in the finished part of the basement, I decided to give it some color. I sprayed the bench top green, reminiscent of a dispatchers desk and gave the legs a few coats of polyurethane. It now resembles furniture and could be added to the finished part of the basement.

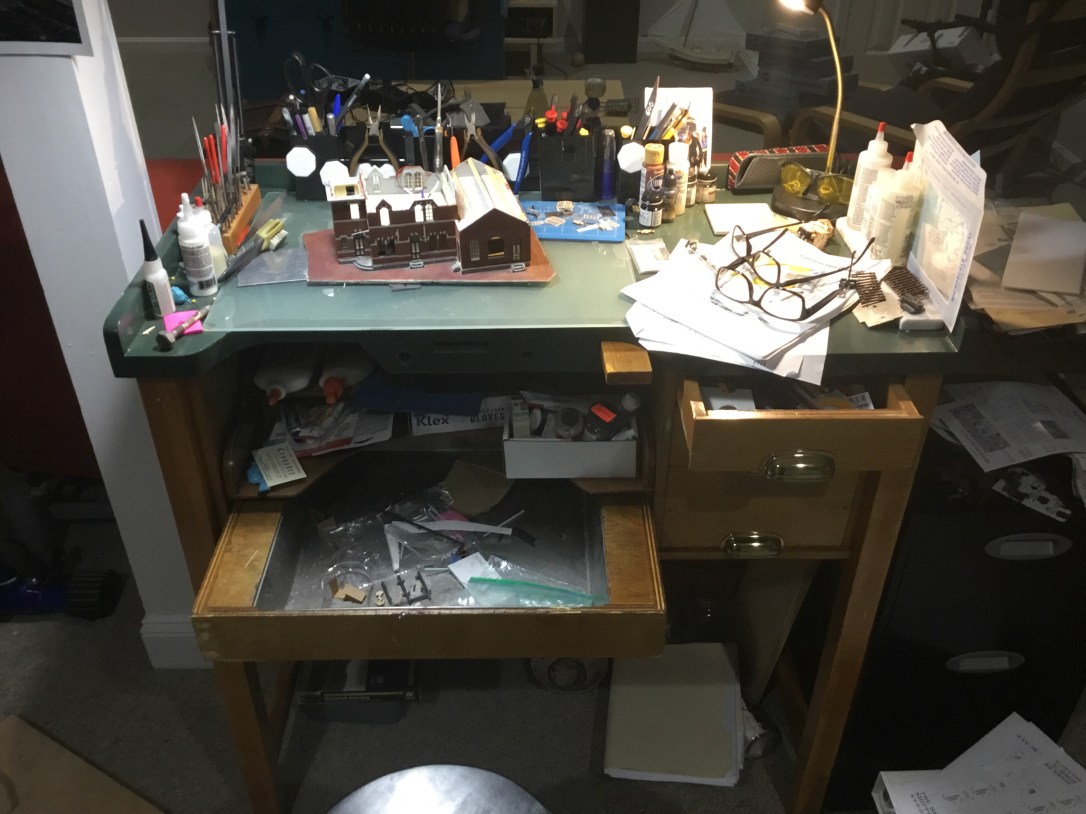
A cheap stool from Ikea added an adjustable seat to meet ergonomic considerations and I was in business. It is still a little disorganized as I put it into use while still trying to figure what should go where. I am hoping time at the bench will help me understand which tools are most used and need to be closest to the work surface. The metal lined tray tray below is designed to catch dropped parts but it has turned into a trash bin at present. It still catches stray parts but I have to search for them. There are elbow rests that extend from the work surface. I have yet to use them, but I am sure they will help me have a steady hand for fine detail work. It may not work for everyone, but I am happy with my investment. It has made me more organized already and I continue to go in that direction. Frustrating accidents and lost parts are being reduced and I am learning to be more systematic. So far, so good.

Follow B&O Modeling on WordPress.com

Building a layout. It needs legs.

This is the obvious place to start a blog about a layout, actually building the structural layout. I’ll start there and back-fill the details.

Late in 2013 I returned to where I’m from, Baltimore. We bought a house just off the old North Central Railroad in what was an iron works village before, during, and after the Civil War. Some of the standing buildings date to 1840, mine is a newer with a finished basement. A key ingredient to modeling in the mid-Atlantic.

After a few years of painting and home improvement I had some time to start considering a layout. I liked The One Module Approach (TOMA) championed by Joe Fugate. I wanted to combine it with the David Burrow Domino Module concept and see where it led. My teenage experience made me doubtful of using a scaled plan and getting it all to layout smoothly and derailment free. I wanted to sketch some ideas, build some 2’x 4’ modules and layout it out full scale. I felt that would suit my style better as I wasn’t hand-laying track, despite my previous real world experience laying full size track.

I started with a sketch of a small space in the basement that wouldn’t interfere with the other functions of the space. I drew some schematics on graph paper to let me know what I might be able to include.

A656CAD9-5F71-4EAB-AB42-B8D0D461D9EA

Twenty years ago I sketched out that dream layout starting at Camden Station in Baltimore. My dad’s office was there before it was a ballpark. Before I was old enough to drive, I would catch trains down to DC from Camden to look around at the museums and just to get away. It paid off long term, I took my wife there on our second date and she was a little impressed that I knew something about the museums and their contents.

7F51A6ED-8A36-4795-AE59-8CA8BBF56145
Ilchester Station, source unknown.

The line from New York City under Baltimore’s Howard Street emerging and at Camden Station seemed like the perfect place to hide some staging. Good concept but I also spied another location on the Old Main Line to have a layout emerge from staging. Ilchester. The research on that location started about 15 years ago and I was going to put it to work on my new layout. It would the east end of my layout with a someday connection to staging in an unfinished space behind a wall separating the finished from unfinished basement.

That is my starting point so I set about building some modules, kept drawing sketches, and subscribed to Trainmaster.Tv for $5.99 and used my time on the treadmill in the morning to watch some great videos. Each day I found something new to catch me up after ten years of little to no modeling. I found a good airbrush and instructions on how to use it and keep it clean, inspiration from a B&O layout, and a detailed series on building a first layout.

F5C759B3-602A-4378-9C07-F8AFD6571D98

Previous experience, conversations with Don Barnes, and the TOMA building series taught me to lay a sound foundation. I started with a trip to Home Depot for a 4’x 8’ sheet of 1/2” birch clear plywood. I had it quartered into 2’x 4′ pieces at the store and it all fit in my Mini Cooper S. I made a cut sheet to maximize my lumber use and ripped a bunch of 3 3/4” wide strips as basic building blocks. It helped to have a table saw, though this could have been done at the lumber yard for a charge and cut shorter at home with a chopsaw to get the needed lengths.  I did some drilling with a hole saw to look like the commercial products and make wiring easier. I also borrowed from the commercial product designs and purchased a pocket screw jig to make easily changeable joints. I added screw-in feet for leveling. One photo below shows that I was able to build three 2’x 4′ modules from the initial $50 piece of plywood and I have pieces left over for risers. It is always recommended in the modeling press, home-building, and juxtaposing my teenage experience; start with a solid foundation.

BDEBB013-046D-4435-BBBE-31F2F05C8A07

Follow B&O Modeling on WordPress.com

The Journey Begins

Let me start my blog by offering some of my initial ground rules. This will start as a way to follow my journey of modeling the B&O. Hence the domain name. I will show some things I am working on and try to share more complete versions of some things in the B&ORRHS’s B&O Modeler magazine.

My journey to build this layout started with a 4’x8’ sheet of 3/8” plywood and a frame to hold it up in the early 70’s. My dad built it and I used an Atlas snap track plan from a small book and built a double mainline loop with two sidings. I read a lot of magazines and I was convinced I needed a double wishbone to have some “operations”. To me that meant two or more trains running on a mainline and passing each other. I like watching trains. I added 2”x 2” legs and 1”x 2” risers to support my expanded and multi-level layout.  It looked good, but never operated well, derailments were frequent.

I was twelve, so what did I know. I got to build stuff and learn some lessons. Flash forward a few years. I worked as a trackman on the B&O during my college summers in the early 80’s. Hard work, but it paid well and taught me more lessons. My best summers were spent on the Old Main Line. After the first hard summer on a tie gang, I was able to hold a job working out of Sykesville, MD. This was a union job and seniority mattered. I chose jobs that would end before school started to keep my seniority. Our duty station was in the old station, the main lobby had a few lockers and that is where I reported to work and changed clothes each morning and afternoon. The old fire station across the parking lot was a sandwich shop and I always got an egg on toast sandwich before work.

sykesville firetruck
Skyesville Fire Station

As opposed to a tie gang that replaced 500 ties a day on the lines between Philly and DC working on a production unit with machines, this was paradise. My first day on the tie unit, the spike pulling machine was stolen and me and another guy had to work ahead of the unit and pull at least 1,000 spikes each for the day. Spikes are pulled with a 5 foot, 30 lb. claw bar.  It was a good workout, trust me.

Sykesville was a just couple of jobs a day with 3 other trackman and a foreman in the quiet park-like setting. Jobs were things like manually replacing three ties, adding stone and tamping up a low, mud spot, or working with a welding crew out of Charlestown, WV to add Boutet welds in place of joint bars put in place for the new (since Hurricane Agnes) signaling system.

2018 March OML 148
The curve west of Ilchester in 2018, Bruce Griffin photo

Those days, along with my desire to model the steam era when my father, uncle, and grandfather worked for the railroad drew me to my layout topic. In my younger days I always dreamed of modeling from Camden Station to Point of Rocks Station, but eventually I decided I needed to get some trains running again and not just build things for that someday layout. Watching Don Barnes showed me how much effort and resources that it takes to build such a large layout.  Lesson learned.

Moving back to Baltimore after years in North Carolina gave me the chance to start a layout. I live 600 feet from the old PRR Line north from Baltimore to York, but couldn’t bring myself to model it. It is now called the NCR Trail, using the old line’s original name, the North Central Railroad. I do get to bike along it any time I want. I am part of a B&O family, my grandfather Emmitt was the stationary engineer for the B&O Building, my father Ken spent his career in safety and casualty prevention, and my uncle Jack was in passenger operations. My aunt’s father-in-law was an engineer on the original tunnel motors under Howard Street.  You are what you are…

2018 March OML 267
Ilchester Bridge and Tunnel in 2018, Bruce Griffin Photo

Take a look at this video. It is taken from on top of the hill at Buzzard’s Rock, like my favorite photo of Ilchester. I will update it along the way to show the progression of the layout. I just added sound to these old Proto2k Alcos and I need to finish backdating them to match their as-delivered look (a future blog). My favorite thing is the way the headlight looks non-descript but as the angle changes the original equipment dual sealed-beams become apparent.

Follow B&O Modeling on WordPress.com