

I have written before about my switch to acrylic paints, specifically Vallejo paints for airbrushing. To keep down the mess in the house, I wanted a cheap, lightweight spray booth with lots of light and an exhaust system for the particles and slight odor. I have been airbrushing inside with a cardboard box and using a respirator to catch particles before the entered my body. It had its limitations.

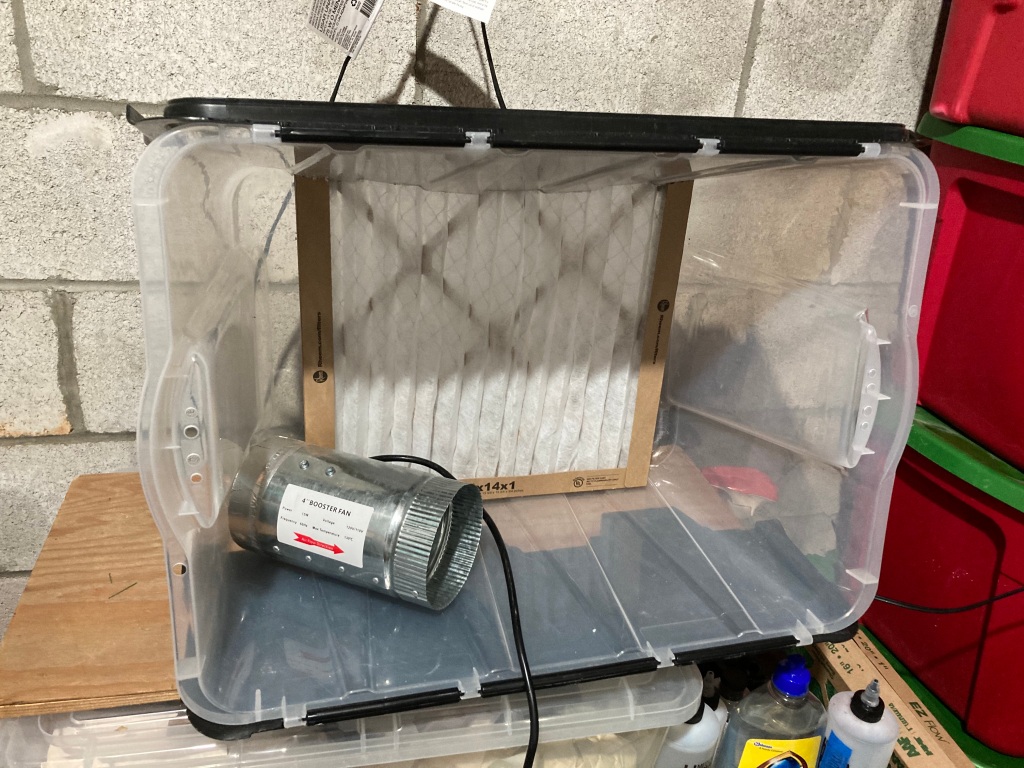
I started with the idea of using a plastic storage crate about the size of my cardboard box. The plastic was hard to work with as it was brittle and my search for an inline exhaust fan didn’t work out. I was hoping the clear plastic could help with lighting inside the booth, be lightweight, and portable for future moves.
I live on top of a large granite and marble deposit, one of the revenue sources for the NCR that run through this area starting back in the 1830s. These deposits off-gas low level radiation, so my house is fitted with a radon removal system. It is basically a hole in the basement slab with an extraction fan outside of the house to pull the radiation up and away from the house. When I first moved in seven years ago, the exhaust fan on the side of the house wasn’t working, so I found the same fan model and replaced it. Just last month the fan started to vibrate, maybe a bearing was wearing, and it caused a reverberation throughout the house. A new fan was sourced for about $150 and the replacement (a new model number with slight design changes) ended the house-wide vibrations. Then I realized I had a fan that could pull 160+ cfm that works, but with a slight vibration. Paint booth dreams were again alive. And one big advantage is this fan is that it is meant to connect with 4″ PVC pipe and easily adapted to use flexible, metal 4″ dryer hose connections.
The main lesson that I can share from this experience is that lightweight construction is possible on a budget. A little time woodworking with a table saw can provide a strong frame and the walls can be thin and lightweight. Like the walls on the inside of a house, the framing provides the structure and the skin can be weak. Having enjoyed the size of my cardboard box, I used it for a start and created the main structural members from 3/4″x 2″ poplar. You can use another wood, but I was lucky to have access to some hardwood stocks that a friend was willing to share. I created two 18″x !8″ frames for the sides and used half-lap joints with glue, then a light spray to polyurethane to seal the wood. A glued half-lap joint is very strong and provides the main structure for the booth. The width between the two sides was determined by the width of a roll of easel paper. I saw this online, someone used a roll of drawing paper hung at the top, back of their paint booth to allow for a renewable white background for painting and possibly photography. The rolls are available through Amazon and much cheaper at many craft stores for $6, they are used for children’s art easels.


For the bottom of the box I used a thin piece of plywood lying around in the garage. It was 1/4″ pine, which helped with keeping the box light. I added a second piece of 1/4″ under the front lip for dimensional stability. My second choice was a piece of 1/2″ birch plywood left over from layout framing. The width was 20″ to allow for the paper roll to fit within the side frames. The depth was set at 22 1/2″ to give me a little lip on the front of the box for paint bottles, cleaning supplies, and the spray-out pot I use to clear my airbrush. The side frames were screwed from the bottom of the plywood base. I skipped glue here in case I want to take it apart or adjust the size. The added a lip also gave a place for the paper roll to be slid under and secured.

I wanted the top to be clear or translucent to allow light to enter the box and possibly add lighting from outside the box. I was leaning toward buying some plexiglas to cover the 20″x 18″ top of the box. I didn’t need a solid piece of plywood like the bottom foundation, so I was thinking of just using some 20″ wide scrap strip to the keep the sides from moving too much with the plastic to fill the space. Once again a scrap piece of material came to mind. I had several 12″x 12″ pieces of glass from former wall decorations that I had saved to use for my modeling bench as replaceable smooth work surfaces. A couple of pieces of the poplar hardwood I received had reliefs cut into them so two 18″ pieces became the top braces, along with another scrap piece for the back edge. I was going to screw the glass in place as the pieces had holes in the corners, but I decided to use two more pieces of the same trim to capture them in place within a frame, a few thin screws helped hold this together and make it removable should the glass become to covered in overspray.

For lighting I am using a simple metal, portable flood light sitting on top of the glass and two short screws into the cross braces to keep it from moving and stay above the glass. The light fixture is fitted with a 5000k LED floodlight bulb which operates cool to the touch and is the same bulb used over my layout. Do not try this with an incandescent bulb, they are way too hot and a possible fire hazard being in contact with cardboard and finished wood! The 5000k bulb should help with having the paint applied in the booth look the same as it would on the layout.

A simple dowel was used to hang the roll snugly between the sides. I mounted it as high and as far back in the box as possible. The roll I bought is 75′ long so I need to remember to buy the same size in a few years as I have seen much longer rolls with larger diameters available. The cardboard used for the back wall is visible.
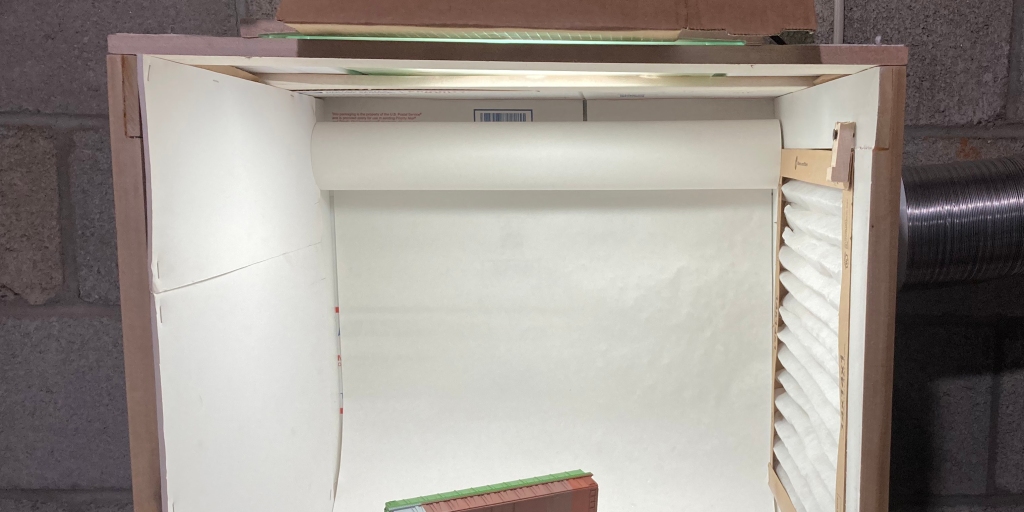
Adding white cardboard or foam-core is just the covering for the back and the sides, it provides no structure, but keeps the negative pressure pulling air from the front of the booth (where is protects the user) and white allows for better light reflection inside the box and thus more light on the paint subject. It is just stapled in place so that it is easy to replace. We’ll see how this works over time.
The radon fan needed a mount as in its primary use it is attached to braced 4″ PVC pipe with rubber collars on the outside of the house. (insert photo of fan outside house). Here again I took advantage of scrap lumber, this time a 24″x 24″ piece of birch 1/2″ plywood left over from my layout’s modular structure construction. I built a shelf 10″x 10″ to be as wide as the fan and used a jigsaw to cut a 5″ hole in the center to allow the fan body to sit down into the shelf. To mount the shelf to the cinder block wall of my basement I cut a mounting bracket with a dado cut to fit the shelf and then added some angles from the shelf down to the bottom of the mounting bracket. I gave this a light spray of polyurethane to give it some dimensionally stability over time. After attaching the mounting bracket to the wall with three Tapcon concrete screws, I added a couple of drops of acrylic adhesive caulk to attach the fan housing to the bracket and keep it from moving around, while providing a soft mount to keep vibrations to a minimum. I only used a couple of drops of adhesive as I want to be able to cut the fan free should it fail in service.


Venting the booth outside house is always a challenge. A window can be a great option. I didn’t have this option in the unfinished side of my basement. Then I caught a lucky break that not one in a million modelers gets, I found an unused dryer vent to the outside just seven feet from my intended booth location. It still goes outside and was plugged with expanding foam to keep out small animals. I can’t figure out why it is there, the washer-dryer is fifteen away and there are no nearby plumbing connections to suggest the washer-dryer had been moved at any point. I can’t help you if you are not that fortunate, but I can say the radon fan will push some air as it is sized to move a lot of air two stories up, so a longer run on the exhaust side of the fan is practical. Keep in mind this is only for use with non-flammable solvent paints and finishes, don’t try this with flammable solvent based paints!!! If it doesn’t clean up with water, I don’t use it.

This is a design-build project, so I had a general sketch or two in place and set out to build it to meet the design intent with the materials on hand, adjusting as needed. And I am writing this blog as I am building it, so one of the last details to complete was how to connect the duct work to the side of the box. In the original plastic storage crate design I was going to use a 14″x 14″ filter in front of the fan connection at the back. I realized a side mount fan would be better for my new box design and allow the booth to sit closer to the wall and more out of the way. I knew this wasn’t a good a design to get the best laminar flow across the face of the paint booth, but with 160 cfm pulling through the fan, I was going to exchange all of the air in the box about once every two seconds. Adequate air flow shouldn’t be a problem. The plan was to put a 4″ coupling for flex duct on the top edge, near the back of the side nearest the fan and use some type of filter to protect the fan from paint particles. So far I have only invested time, as all the materials were on hand. I grabbed the 14″x 14″ inch furnace filter to see how I could attach it to a side frame or maybe consider something else. Serendipity struck again and the filter fits perfectly into the popular side frame opening. It was a press fit! I would like to say that was planned, but it was per luck. With the fan pulling through one corner of the filter, I actually think I can get four times the filter life as I will rotate it periodically to put a fresh corner of the filter closest to the fan intake. So next I attached a coupling connection to a 5″x 5″ piece of the 1/4″ plywood with a 4″ hole and…

The finished box, now a paint booth, needed to be attached to the wall and/or held up on legs. I wanted the booth at layout height so I was painting models at the height they would be viewed. I decided to use some plastic shelves from Lowes that are 18″ wide. I attached them to the wall with 1-1/2″ conduit clips to keep it in place. It was a little top heavy. The $20 shelves gave me a place for paint and thinners. A nice bonus.
I connected the flex dryer hose to the connector and hit a few gaps with duct tape for some and caulk for permanent connections. I may add a piece of plexiglas across top front to increase air movement through the box. It pull the fumes away, but you can never have too much ventilation.

This was a fun project and added a little professional touch to my modeling. It doesn’t hurt to have nice tools and this one was low cost. Model on ya’ll.
